
3
appropriately qualied technician.
7. Unplug from outlet when not in use, before putting on or taking o parts, and before cleaning.
8. Never feed food by hand. Always use food pusher.
9. Blades are sharp, so handle carefully.
10. The use of attachment, not recommended or sold by manufacture may cause re, electric
shock or injury.
11. The appliance cannot be used for blending hard and dry substance, otherwise the blade
could be blunted.
12. Do not let cord hang over edge of table or counter.
13. Do not use ngers to scrape food away from discharge disc while appliance is operating. Cut
type injury may result.
14. Do not use outdoors. This device is intended for household use only.
15. Never run the appliance empty after assembling the blade and blade disk. Otherwise the
blade and blade disk will be abraded seriously, and accelerate the unit aging.
16. This appliance can be used by children aged from 8 years and above and persons with
reduced physical, sensory or mental capabilities or lack of experience and knowledge if they
have been given supervision or instruction concerning use of the appliance in a safe way and
understand the hazards involved. Children shall not play with the appliance. Cleaning and
user maintenance shall not be made by children unless they are older than 8 and supervised.
17. Although the device has been checked its usage and consequences are strictly user
responsibility.
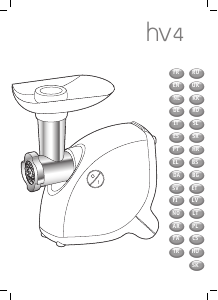
1) PARTS
Pic. 1 (see: PICTURES,Pic. 1)
1. main unit
2. power switch
3. accessory box cover
4. food pusher
5. funnel
6. meat tube
7. release button
8. sausage funnel
9. lock nut
10. blade disk large
11.blade disk medium
12. blade disk small
13. blade
14. mincing screw
15. kibbe cone
16. kibbe shaper
17. upper ledge
18. lower ledge
2) BEFORE FIRST USE
Before the rst use, please clean all the detachable parts such as food pusher, funnel, meat tube, mincing screw, blade, blade disk, lock nut, and so on completely. The blade is
sharp, extreme caution is needed not to hurt yourself.
3) USAGE
Mincing
Caution: Make sure the appliance is unplugged when assembling.
1. Assemble the meat tube into the main machine (insert the meat tube onto the main machine by aligning the grooves, push in and afterwards turn it counter clockwise until it
cannot move any longer and you hear a “click” sound (see arrow 2 of Pic.2; see:PICTURES,Pic.2).
2. Assemble the mincing screw, blade, blade disk and lock nut as illustrated in picture 3 (see:PICTURES,Pic.3)
Note: Make sure the edge of blade is facing toward the blade disk when assembling. Never assemble the blade reversely.
3. Put the funnel on the meat tube.
4. Ensure that the power switch is set at “O” position, then plug in power supply.
5. Press the power switch to “ON”position (the mincing screw and the blade start rotating), when the appliance operates normally, put the meat piece into funnel, then gradualy
press it down with the food pusher.
Note: Cut all foods into pieces (sinewless, boneless and fatless meat is recommended, approximate size: 20 mm x 20 mm x 60 mm) so that they t easily into the funnel opening.
6. The max continuous operation time should not exceed 1 minute and minimum 1 minute rest time must be maintained between two consecutive cycles.
7. Place container under lock nut to receive minced meat.
8. When nish mincing, unplug the power source, disassemble the meat tube assembly: press and hold the release button with one hand while turning the meat tube assembly
clockwise with other hand and then remove it.
Caution: Ensure that the main machine is unplugged when disassembling.
Reverse function
1. In case of jamming press the power switch to “O”position and allow mincing screw to come to a complete stop.
2. Press the rocker switch to “R”position, mincing screw will be rotating in opposite direction, and the meat tube will get empty. If the main machine does not work, press the rocker
“O”, unplug the device and clean it manualy.
Note: The“R”position max operation time shall not exceed 5 second.
Making sausage
1. Assemble the meat tube into the main machine (insert the meat tube onto the main machine by aligning the grooves, push in and afterwards turn it counter clockwise until it
cannot move any longer and you hear a “click” sound (see arrow 2 of Pic.2; see:PICTURES,Pic.2).
2. Assemble the mincing screw, kibbe cone, sausage funnel, lock nut as illustrated in the picture (see: PICTURES, Pic.4).
Note: Never assemble blade and blade disk when making sausages, and do not assemble sausage funnel or kibbe cone when mincing meat.
3. Set clean small intestine to sausage pole as the picture 4 (see:PICTURES,Pic.4), then place minced meat into funnel.
4. Press the power switch to “ON”position (the mincing screw starts rotating) and the minced meat enters the intestine.


Liituge selle toote teemalise vestlusega
Siin saate jagada, mida arvate Delimano MG5849-GS Hakklihamasin kohta. Kui teil on küsimusi, lugege esmalt hoolikalt kasutusjuhendit. Kasutusjuhendit saab taotleda kasutades meie kontaktivormi.
vastus | Sellest oli abi (0) (Google'i tõlgitud)