ENGLISH
Introduction
.
Dear customer, you have made the right choice!
Your new Philips hair clipper adapts to the
contours of the head and enables comfortable use.
Important
.
Read these instructions for use carefully before
using the appliance and save them for future
reference.
◗ Check if the voltage indicated on the adapter
corresponds to the local mains voltage before
you connect the appliance.
◗ This appliance is suitable for mains voltages
from 220 to 240 volts.
◗ Only use the adapter supplied.
◗ The adapter contains a transformer. Do not
cut off the adapter to replace it with another
plug, as this will cause a hazardous situation.
◗ Do not use a damaged adapter.
◗ If the adapter is damaged, always have it
replaced by one of the original type in order
to avoid a hazard.
◗ Do not use the appliance when one of the
attachments is damaged or broken as this may
cause injury.
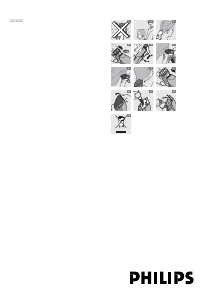
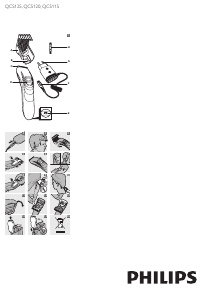
◗ Keep the appliance and the adapter dry (fig.
1).
◗ Keep the appliance out of the reach of
children.
◗ This appliance is only intended for clipping
human hair. Do not use it for any other
purpose.
◗ Noise level: Lc = 69 dB [A]
Using the appliance
.
◗ Before you start clipping, make sure the head
of the person whose hair you are cutting is at
the same level as your chest (fig. 2).
◗ To get the best results, use the hair clipper
only on dry hair. Do not use it on freshly
washed hair.
◗ First comb the hair in the direction of hair
growth.
◗ Always move the clipper against the direction
of hair growth, otherwise it will not cut the
hair properly (fig. 3).
◗ Move the clipper through the hair slowly.
Clipping with comb attachment
1 Slide the comb attachment onto the rails on
the appliance ('click') (fig. 4).
◗ Make sure that the arms of the comb
attachment have been properly slid onto the
rails on both sides.
2 Choose the appropriate hair length setting.
The clipper has 7 different hair length settings:
3, 6, 9, 12, 15, 18 and 21 mm.
◗ Hair length settings
The hair length settings are indicated in millimetres
on the arms of the comb attachment. The settings
correspond to the remaining hair length after
cutting.
3 Press the adjustment button on the back of
the appliance (fig. 5).
4 Pass the clipper slowly over the crown from
different directions to achieve an even cutting
result.
◗ Make sure that the flat part of the comb
attachment is always fully in contact with the
scalp to obtain an even cutting result.
5 To achieve a good result with curly, sparse or
long hair, you can use a comb to guide the
hair towards the clipper.
B
We advise you to regularly remove clipped hair
from the comb while clipping.
Precise contouring without comb attachment
You can use the clipper without comb attachment
to contour the neckline and the area around the
ears.
Be careful when you are clipping without comb
attachment, for the clipper will remove every hair
it
touches.
1 Remove the comb attachment by pulling it off
the clipper.
2 Before contouring the hairline round the ears,
comb the hair ends over the ear.
3 Tilt the clipper in such a way that only one
edge of the cutting element touches the hair
ends (fig. 6).
4 Only cut the hair ends. The hairline should be
close to the ear (fig. 7).
5 To contour the nape hairline and the
sideburns, turn the clipper and make
downward strokes (fig. 8).
Cleaning
.
Clean the appliance every time you have used it.
Do not use abrasives, scourers or liquids such as
alcohol, petrol or acetone to clean the appliance.
1 Make sure the appliance is switched off and
unplugged.
2 Remove the comb attachment (fig. 9).
3 Push the middle part of the cutting unit
upwards with your thumb until it opens and
then pull it off the appliance (fig. 10).
Be careful that the cutting unit does not fall to the
floor.
4 Clean the cutting unit and the inside of the
appliance with the brush supplied (fig. 11).
5 Place the two lugs of the cutting unit into the
slot and push the unit back onto the appliance
('click').
Replacement
.
A worn or damaged cutting unit should only be
replaced with an original Philips cutting unit.
1 Push the middle part of the cutting unit
upwards with your thumb until it opens and
then pull it off the appliance (fig. 10).
2 Place the two lugs of the new cutting unit into
the guiding slots and push the unit onto the
appliance ('click') (fig. 12).
Environment
.
◗ Do not throw the appliance away with the
normal household waste at the end of its life,
but hand it in at an official collection point for
recycling. By doing this you will help to
preserve the environment (fig. 13).
Guarantee & service
.
If you need information or if you have a problem,
please visit the Philips website at www.philips.com
or contact the Philips Customer Care Centre in
your country (you will find its phone number in the
worldwide guarantee leaflet). If there is no
Customer Care Centre in your country, turn to
your local Philips dealer or contact the Service
Department of Philips Domestic Appliances and
Personal Care BV.



Liituge selle toote teemalise vestlusega
Siin saate jagada, mida arvate Philips QC5000 Juukselõikur kohta. Kui teil on küsimusi, lugege esmalt hoolikalt kasutusjuhendit. Kasutusjuhendit saab taotleda kasutades meie kontaktivormi.